
Creating and Managing Agents
Agents enable Kindo users to automate workflows including security runbooks, SRE playbooks, DevOps procedures, and ITOps response workflows. This guide covers how to create and manage agents.
My Agents
Section titled “My Agents”After signing in, select the Agents tab to see your recently used agents and all agents available to you (both your own and shared).
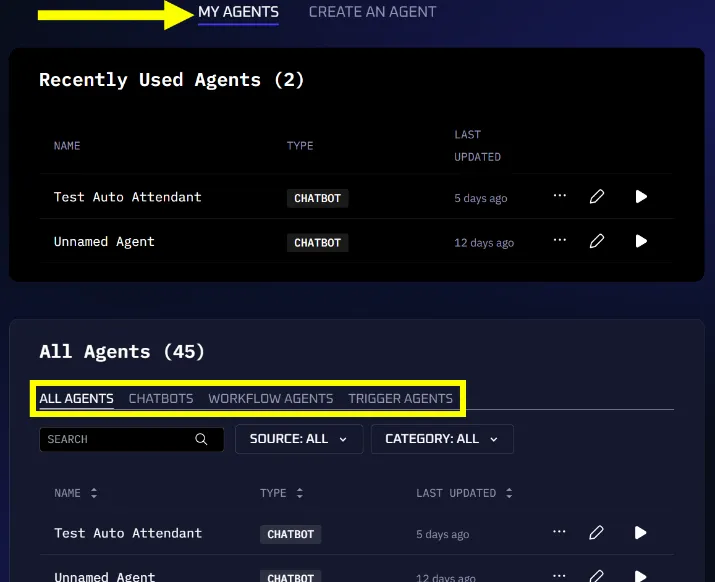
Filter agents by type using the tabs: All Agents, Chatbots, Workflow Agents, or Triggered Agents.
Each agent supports the following actions:
- Share — Make the agent available to other users in your organization
- Delete — Permanently remove the agent
- Edit — Open the agent for modification
- Run — Launch the agent
Creating an Agent
Section titled “Creating an Agent”Select Create an Agent at the top of the Agents window, then choose the agent type: Triggered, Workflow, or Chatbot.
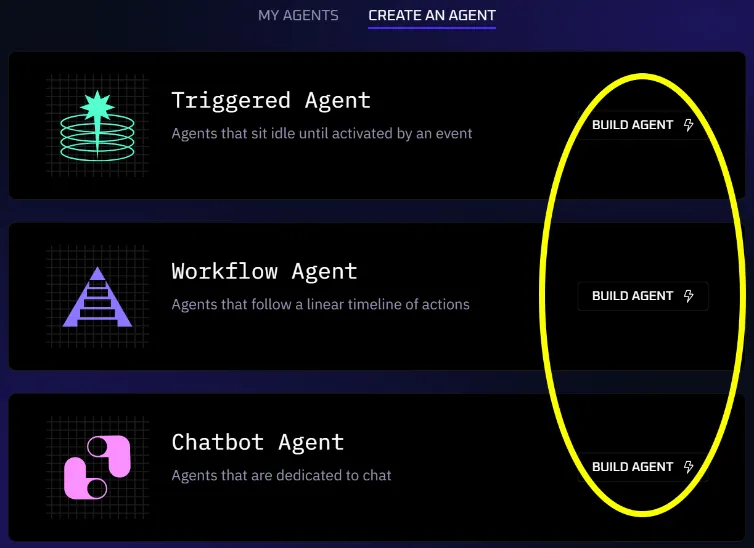
A Triggered Agent runs in response to an external event. Kindo supports two trigger types, chosen from the Add Trigger dropdown when building the agent:
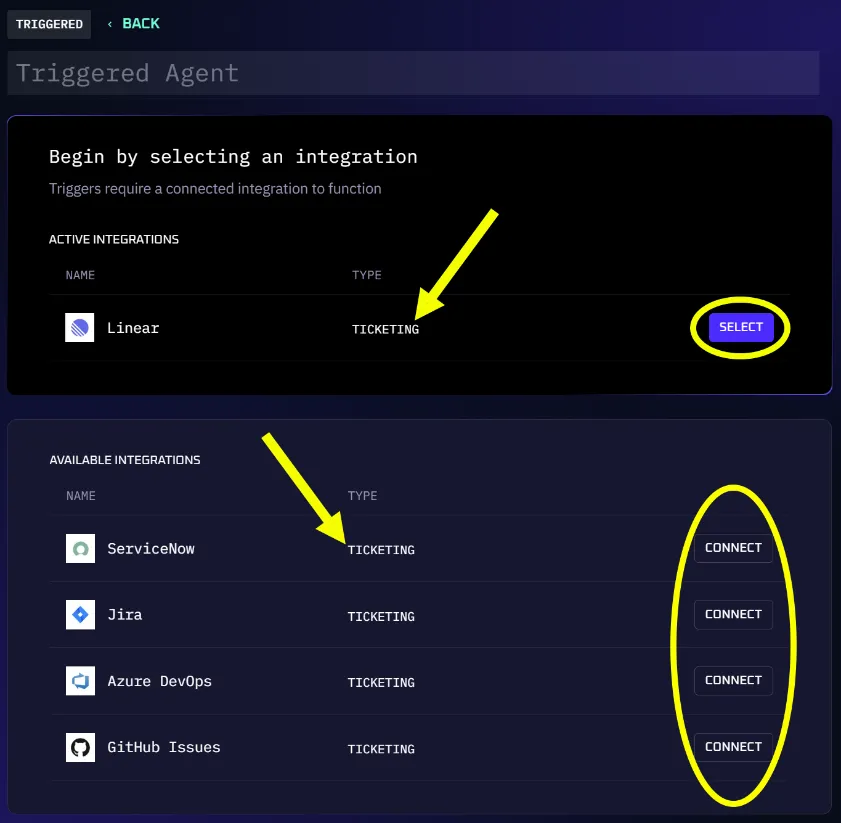
- Integration Event — Fires when a connected integration (Jira, ServiceNow, Linear, etc.) emits a matching event. Conditions are defined against typed fields from the integration. Requires the integration to be pre-configured.
- Direct Webhook URL — Generates a unique URL that any external system can
POSTto. The trigger fires on every request, with optional natural-language gating against the request payload. Use this when no native integration trigger exists, or when you want to invoke an agent from an arbitrary system or script.
A workflow can have one trigger of either type at a time.
Integration Event Triggers
Section titled “Integration Event Triggers”Configure the Integration
Section titled “Configure the Integration”- Select the gear icon to open Settings.
- Navigate to the Integrations tab.
- Select an existing integration or click Connect (or New Connection if you already have connections) to add a new one.
Add Trigger Conditions
Section titled “Add Trigger Conditions”Use Add Condition to define the trigger event:
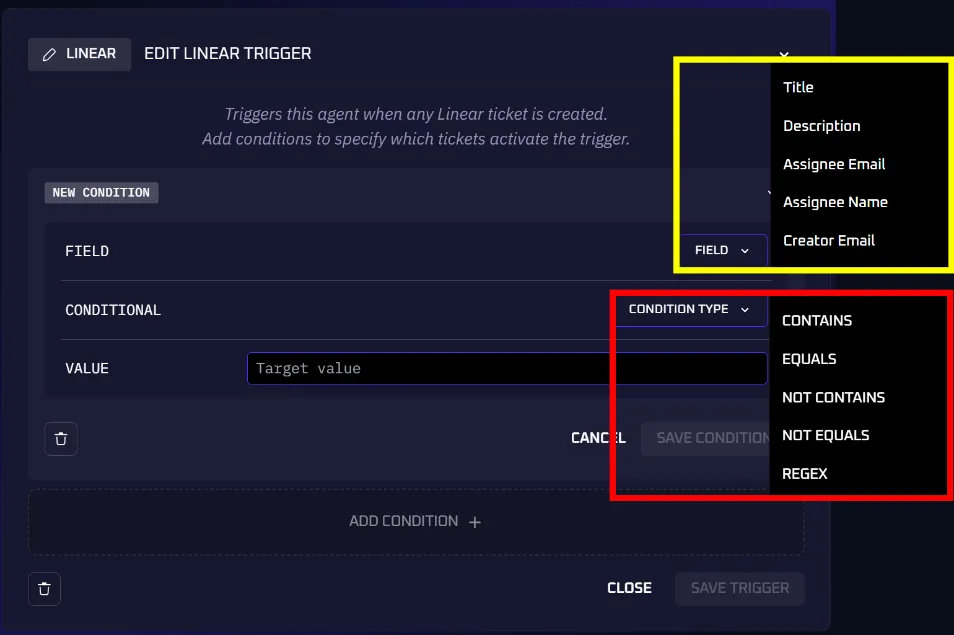
- Field — The field from the integrated application to monitor
- Condition Type — How to compare the field to the target value
- Target Value — The value to compare against (supports wildcards
*and?)
Example: Assignee Name EQUALS John
Click Save Condition, add more conditions if needed, then click Save Trigger.
Direct Webhook URL Triggers
Section titled “Direct Webhook URL Triggers”A Direct Webhook URL trigger generates a unique, token-protected URL of the form:
https://api.kindo.ai/webhook/agent/<workflowId>/<token>(Self-Managed deployments substitute their own API hostname.) Any system that can make an outbound HTTP request — Linear, Datadog, GitHub Actions, a cron job, a curl command — can POST JSON to this URL to trigger the agent. The full request body is forwarded as the trigger payload (see Referencing the Payload from Agent Steps below).
Save the Trigger to Mint a URL
Section titled “Save the Trigger to Mint a URL”In the agent builder, click Add Trigger and choose Direct Webhook URL. The webhook URL is generated only after you save the trigger — saving creates a cryptographically random secret token that is embedded in the URL. The save button reads Create Webhook for a new trigger and Save Changes when editing.
After saving, the Webhook URL field appears with a Copy button. Treat this URL as a secret — anyone holding it can POST to your agent. To rotate the token, delete the trigger and create a new one.
The same URL can be reused across multiple systems.
Success Response: a Watchable Run Handle
Section titled “Success Response: a Watchable Run Handle”When the token validates and the trigger is active, the endpoint responds 202 Accepted — the run was accepted and is processing asynchronously — with a run handle in the body:
{ "id": "resp_run_04f0faa6-2e66-4f5a-b49f-6a28daa58d9b", "object": "response", "status": "in_progress"}The id is a Responses API run handle: poll GET /v1/responses/<id> (with an API key) to watch the run’s status, stream its progress with ?stream=true, or read its output items — see Invoking Agents via the Responses API. Rejected requests (bad token, inactive trigger) still return 200 but carry no handle.
Run Condition (Optional)
Section titled “Run Condition (Optional)”Direct webhook triggers fire on every incoming request by default. To gate execution, supply a natural-language Run Condition in the editor:
When a ticket is created with high priority
When a request arrives, an LLM evaluates the condition against the entire webhook payload and decides whether to continue. If the condition is not satisfied, the agent does not run and the run record behind the returned handle is marked Cancelled (GET /v1/responses/<id> reports status: "cancelled"). The condition is free-form — it can reference event types (create, update), specific fields, or higher-level intent (“only when the ticket mentions a customer outage”). Whatever the integration sends is fair game.
Fail-open behavior. If the condition evaluator itself fails — for example, no model is available, or the underlying LLM call errors — the agent runs anyway. The failure is captured in the Agent Direct Webhook Condition Evaluated audit event’s Error field, so a user troubleshooting “the agent fired despite my condition” can spot it there.
Active Toggle
Section titled “Active Toggle”The trigger has an Active toggle. When inactive, incoming requests are accepted (and return 200) but the agent is not invoked. Use this to pause a webhook without revoking the URL.
How Requests Are Authorized
Section titled “How Requests Are Authorized”The endpoint always returns 200, regardless of whether the token validates or the condition is satisfied — this prevents external systems from retrying on rejected requests. When the agent does run, it executes under the workflow creator’s identity — their permissions, org context, and credits. The external caller is not a Kindo user.
Referencing the Payload from Agent Steps
Section titled “Referencing the Payload from Agent Steps”The webhook payload is given to the agent as context for the run, so every step in the agent can see it. Write step prompts as if the payload is already in front of the model — for example, “Summarize the ticket above,” or “If the priority is High, draft an incident response.”
Auditing and Debugging
Section titled “Auditing and Debugging”Two audit-log events back this flow, viewable in Settings → Organization → Audit Log:
- Agent Direct Webhook Condition Evaluated — Recorded for every evaluation. Shows Condition Satisfied (true/false) and Condition Evaluation Reasoning (the LLM’s explanation), plus an Error field when evaluation itself failed. Use this when an agent did or didn’t fire and you need to know why.
- Agent Direct Webhook Fired — Recorded when a webhook actually triggers a run.
Security Considerations
Section titled “Security Considerations”Direct Webhook URL triggers are intentionally lighter-weight than Integration Event triggers. They have no source-IP allowlisting, no signature verification, and no per-integration security model — anyone with the URL can submit a payload. This is a deliberate trade-off: the trigger works with any system, but it relies on URL secrecy and the natural-language run condition for safety. Prefer Integration Event triggers when a native integration is available; reach for direct webhooks when it is not.
Add Steps
Section titled “Add Steps”Once the trigger is saved, build the agent by adding steps one at a time using the + button:
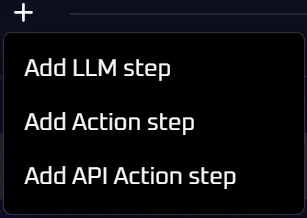
- LLM Step — Enter a natural language query for the model
- API Action Step — Perform an action through an API call (including integration-specific actions like adding Jira comments). Endpoints on private networks and cloud metadata services are refused; see API Action Step.
For Direct Webhook URL triggers, every step can see the webhook payload as part of the agent’s context — see Referencing the Payload from Agent Steps above.
Click Generate when finished. The agent will begin monitoring for trigger events.
Build Manually
Section titled “Build Manually”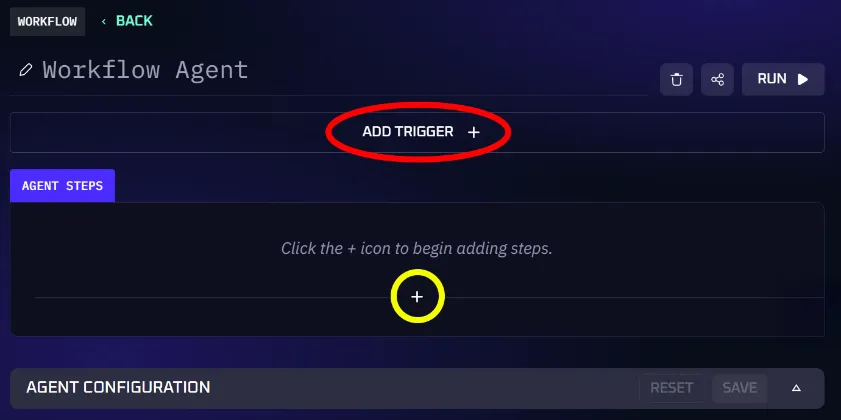
A Workflow Agent can optionally include a trigger. Select Add Trigger and choose either Integration Event (an event from a pre-configured integration) or Direct Webhook URL (a token-protected URL that any external system can POST to). See the Triggered Agent tab for full details on each trigger type.
Add steps using the + icon under Agent Steps:
- LLM Step — A natural language query to an LLM
- API Action Step — A REST API call (manually entered or generated from a prompt using the Magic button). Endpoints on private networks and cloud metadata services are refused; see API Action Step.
Note: When working with integrated systems like Jira or ServiceNow, you may see pre-built actions in the UI (like “add comment” or “change priority”). These are convenience shortcuts that use the integration’s MCP tools behind the scenes — they are not a separate step type. Under the hood, they are API Action steps configured for that specific integration.
Click Generate when finished.
Build with Kindo AI
Section titled “Build with Kindo AI”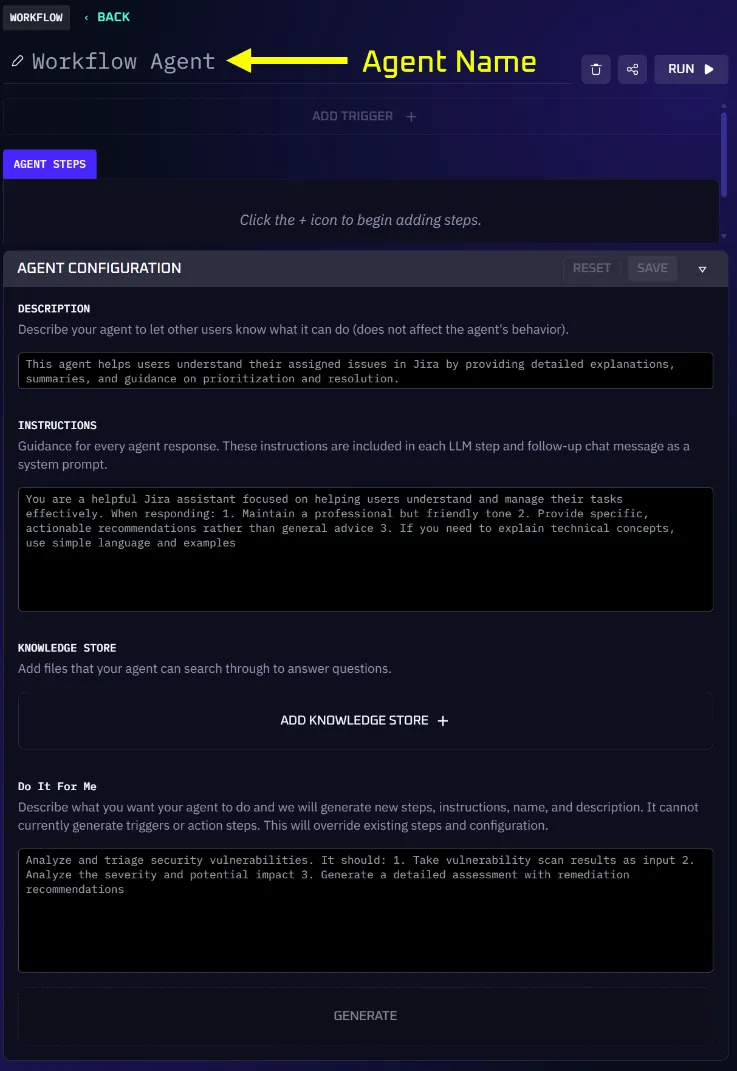
Expand the Agent Configuration panel to use natural language:
- Description — Explain the agent’s purpose (auto-generated if left blank)
- Instructions — Tell the AI model how to process the task, including response format, emphasis areas, and tone
- Knowledge Store — Attach files for the agent to reference
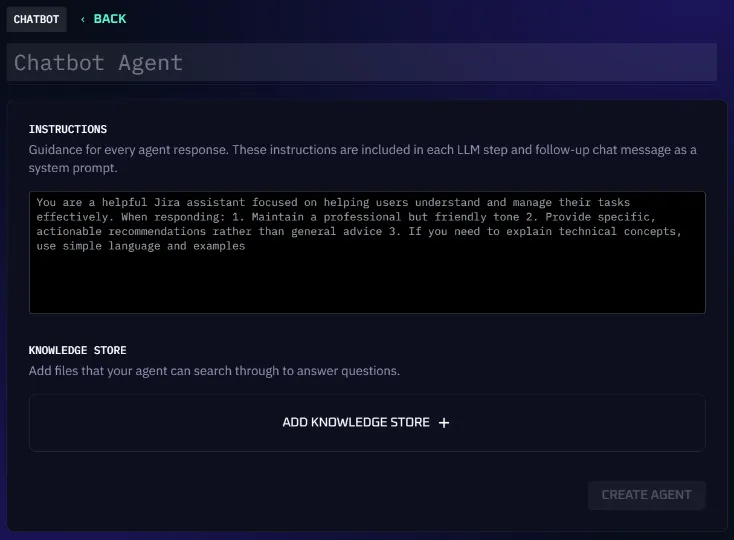
- Enter instructions to guide the agent’s responses.
- Attach relevant files from the Knowledge Store.
- Click Create Agent.
When run, the chatbot prompts the user for a query and responds using the attached files and instructions.
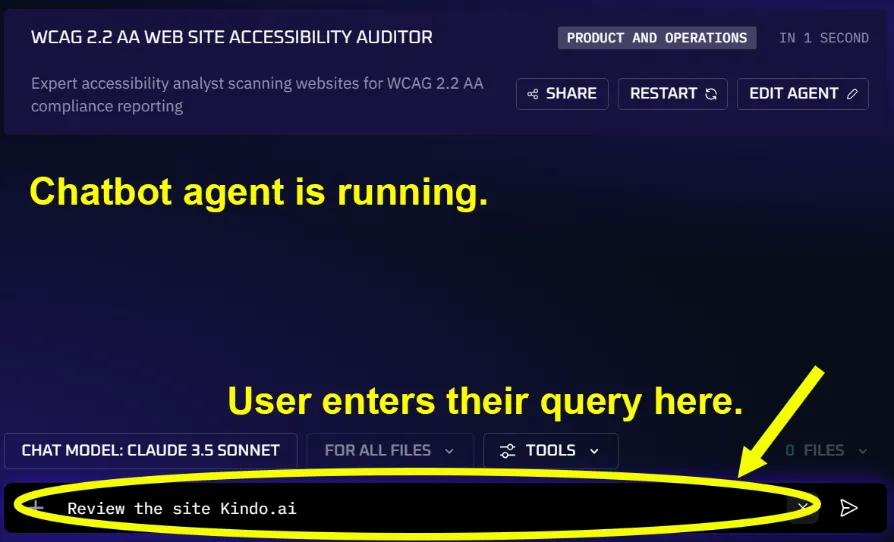
Enable additional search tools:
- Library Search — Search files in the Knowledge Store
- URL Search — Search a specific web URL
- Web Search — Search the internet
Agent Configuration Panel
Section titled “Agent Configuration Panel”Both Triggered and Workflow agents support the Agent Configuration panel for natural language construction:
- Name — Give the agent a name (auto-generated if blank)
- Description — Summarize the agent’s purpose (auto-generated if blank)
- Instructions — Provide context about the agent’s role, response format, and behavior
- Tools — Choose the tool servers that every step and chat of the agent starts from. A step can turn a server on or off for itself. Select Platform to use Kindo’s own tools, which need no integration connection.
- Knowledge Store — Attach files, URLs, or websites as reference material
Integration tools use the runner’s active connections by default. When your organization allows pinning, choose one or more fixed connections for a server in the agent or step’s Tools settings. Everyone running the agent must have access to the connections they use; see pinned connection rules.
Managing Steps
Section titled “Managing Steps”- To delete a step, open it and click the trash icon.
- To reorder steps, drag them into the desired sequence.
- Each step can be assigned a different AI model.
Version History
Section titled “Version History”Kindo automatically captures a version of an agent’s configuration each time it is saved. Versions let you review prior states and roll back to a previous version if a change broke something. The audit log records every restore as an Agent Restored to Previous Version event.
Opening the Version History Panel
Section titled “Opening the Version History Panel”From the agent builder, open the Version History panel via the version-history button in the builder header. The panel lists every captured version, newest first, grouped by day — a TODAY group at the top, followed by groups labeled with the date (e.g. 5/12/2026). Each entry shows the time the version was saved and the email of the user who saved it.
The version currently being viewed is marked with a check icon. The most recent saved version represents the agent’s current state.
Read-Only Version Viewer
Section titled “Read-Only Version Viewer”Selecting a version from the Version History panel opens it in a read-only viewer at:
/agents/builder/<workflowId>/version/<versionNumber>The viewer renders the agent in a read-only layout with up to four top-level sections: Agent Name, Agent Steps, and Agent Configuration (description, instructions, tool servers, knowledge store, flags). If the agent has any triggers, an Agent Triggers section also appears. Each step shows its per-step configuration — model, interaction mode, prompt template, tool servers, and static content for LLM Steps; method, endpoint, headers, parameters, body, and abort-on-failure for API Action Steps. Every field is non-editable, and run controls are hidden. A banner at the top identifies the version and offers a Restore this version action.
Opening the version viewer and listing version history both require EDIT_WORKFLOW permission on the agent. Users with VIEWER-only access cannot open the Version History panel or load a historical version.
Restoring a Previous Version
Section titled “Restoring a Previous Version”Restore replaces the agent’s current configuration with the selected version’s configuration. After restore:
- The agent’s live state matches what the version captured.
- A new version row is written to history with a marker that it was restored from an earlier version. The source-version reference is stored structurally and surfaced in the audit log event, so the restore itself is auditable.
- The pre-restore state is captured as its own version too (if it wasn’t already the latest), so nothing is lost — a second restore can roll forward again.
Like the version viewer itself, restore requires EDIT_WORKFLOW permission on the agent.
What a Version Captures (and What It Does Not)
Section titled “What a Version Captures (and What It Does Not)”A version snapshots the content of an agent — its definition and the resources it depends on by reference. It deliberately does not snapshot sharing, secrets, or live external state.
Captured:
- Display name, description, system prompt
- Tool servers enabled for the agent as a whole, including any pinned connections
- Steps with all per-step configuration:
- LLM Steps — prompt template, model selection, interaction mode, tool server configs, static content
- API Action Steps — method, endpoint, headers, query/body parameters, secret references, abort-on-failure flag
- Inputs (template variables and their settings)
- Triggers (Integration Event, Cron, Direct Webhook) and their conditions
- Knowledge Store attachments
- The Available as subagent flag (see Multi-Agent Coordination Patterns), and the demo-mode flag
Intentionally not captured:
- Sharing and access controls — org role, public role, user permissions, and user-group permissions are not part of version state. Restoring an old version does not change who can see or edit the agent (Google Docs / Notion model).
- Direct Webhook secret tokens — restore preserves the token on the live trigger row when the row was never deleted, but never re-issues a token.
- Cron schedules’ live registrations — schedule and timezone are restored, but the underlying scheduler job is de-registered, so a restored cron trigger does not resume firing on its own.
All triggers land inactive after restore. Integration Event, Direct Webhook, and Cron triggers all come back disabled and must be explicitly re-enabled. This always-disable-on-restore policy is intentional: restoring a months-old agent should not silently resume a webhook listener, integration subscription, or cron job whose downstream side effects may no longer be desired.
Exporting and Importing Agent Definitions
Section titled “Exporting and Importing Agent Definitions”You can export an agent’s definition to a portable JSON file and import it as a new agent — in another account, another organization, or another Kindo deployment. This is useful for sharing agents, keeping backups, and promoting an agent between environments.
Exporting an Agent
Section titled “Exporting an Agent”Export is available in two places:
- From the agent builder — Click Download in the builder header.
- From the Agents list — Open an agent’s row menu and select Download.
Either action downloads a .json file describing the agent. The export is a snapshot of the agent’s definition only. It does not include sharing or access settings, secret values, or live integration credentials.
Importing an Agent
Section titled “Importing an Agent”- On the Create an Agent screen, click Import from file.
- Select one or more
.jsonfiles that were exported from Kindo. You can import up to 20 files at once.
Each file is imported as a new agent that you own — importing never overwrites an existing agent, and sharing settings are not carried over. When you import a single file, Kindo opens the new agent in the builder. When you import several, Kindo shows a summary of what succeeded and what failed.
To create agents from scripts or other tools, use the Create an agent API endpoint. It takes the same definition file and follows the same rules as importing in the app.
What an Import Carries Over
Section titled “What an Import Carries Over”An imported definition contains the same content that a version captures — see What a Version Captures (and What It Does Not). In particular:
- Reconnect your integrations. Integration connections are not transferred. After importing, the builder flags any tool that needs a connection so you can connect your own.
- All triggers are imported disabled. Integration Event, Cron, and Direct Webhook triggers are created off, even if the definition marks them enabled. Turn each one on in the builder. Reconnect an event trigger’s integration first, and re-create a Direct Webhook first, because its secret URL is never exported.
- Unavailable AI models fall back to a default. If a step references an AI model you can’t use — it doesn’t exist in your organization, is restricted, or belongs to another organization — the step is set to Kindo’s default agent step model instead. If the agent’s own model is one you can’t use, it is cleared and the agent uses your organization’s default. The import still succeeds; switch the model in the builder if needed.
- Secrets, Knowledge Store / static content, and skills must exist in your organization. These are matched by reference. If one isn’t available to you, the import of that file fails (see below).
When an Import Can Fail
Section titled “When an Import Can Fail”A file is rejected — and no agent is created from it — when:
- The file is not valid JSON, or is not a Kindo agent definition.
- The definition references a secret, a Knowledge Store / static content item, or the skill a script step runs that does not exist in your organization or that you do not have access to.
- A tool in the definition uses an integration that is not set up on this Kindo deployment.
An unavailable AI model uses the documented fallback. An unavailable integration connection is left unset for you to reconnect, provided the integration itself is set up on this Kindo deployment.
When you import multiple files, each is processed independently. Valid files still import even if others in the same batch fail, and the failures are reported by file name so you know which ones to fix.
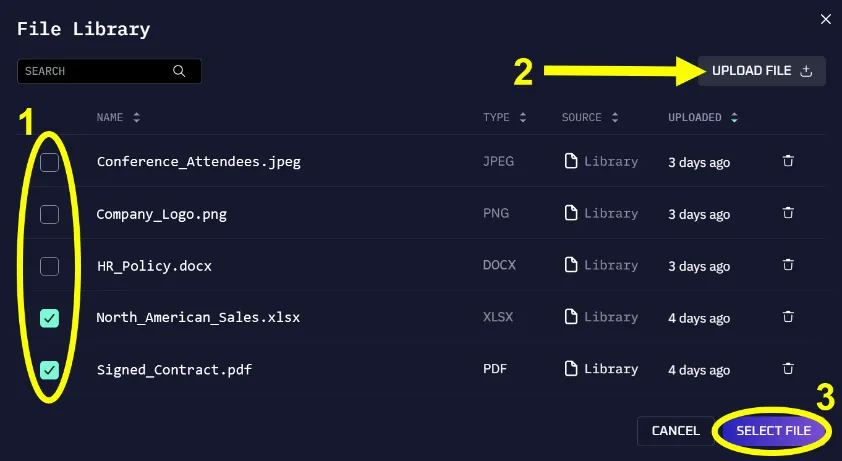
File Library
Section titled “File Library”Add files to Kindo’s library from two locations:
- From Chat — Click the + button in the query bar
- When Creating an Agent — Click Add Knowledge Store
Both methods open the File Library where you can select existing files or upload new ones.
Agent Types Reference
Section titled “Agent Types Reference”Kindo supports four agent types, each designed for different automation patterns:
| Type | Trigger | Best For |
|---|---|---|
| Chatbot | User message | Knowledge base Q&A, helpdesk, conversational interfaces |
| Manual Workflow | Manual run | Runbook execution, one-off reports, on-demand analysis |
| Scheduled | Cron schedule | Recurring reports, periodic compliance checks, daily summaries |
| Triggered | External event | Incident response, alert triage, ticket automation |
Choosing an Agent Type
Section titled “Choosing an Agent Type”Start with a Chatbot when you need conversational interaction or knowledge base access.
Use a Manual Workflow when you need to perform a sequence of operations on demand, especially when those operations involve API calls or data processing.
Add a Schedule when the same workflow needs to run repeatedly (daily security reports, weekly compliance scans).
Add a Trigger when the workflow should respond to external events. Use an Integration Event trigger for events from a connected integration (new tickets, security alerts), or a Direct Webhook URL trigger when no native integration exists or when an arbitrary system needs to invoke the agent.
Best Practices
Section titled “Best Practices”As you move from simple agents to production workflows, consult these guides:
- Prompt and Agent Configuration Management — Version control, testing, and governance for production agents
- Working with Large Context — Techniques for handling large documents, logs, and tool outputs
- Memory and Persistence Patterns — Give agents persistent memory across runs using external systems
- Multi-Agent Coordination — Orchestrate multiple agents to work together on complex workflows